
Christmas Star Decoration
In this quick tutorial I’m going to be teaching you how to use the custom shape tool and a couple of layer styles to create a christmas star decoration.
Step 1
Firstly we need to create a new document – File > New, the size is 600 pixels wide and 420 pixels high. Fill the background with a radial gradient using the gradient tool. The two green colours I have used are #86a722 and #2d380d.

Step 2
Create a new layer and select the custom shape tool from the tool box (under the rectangle tool – left click and hold to see). Go to the list of shapes and choose a star shaped one and set the colour to white. Make the star shape in the middle of the document.

Step 3
Apply the following layer styles to the star. To access the layer styles window right click the layer in the layers window and go blending options.
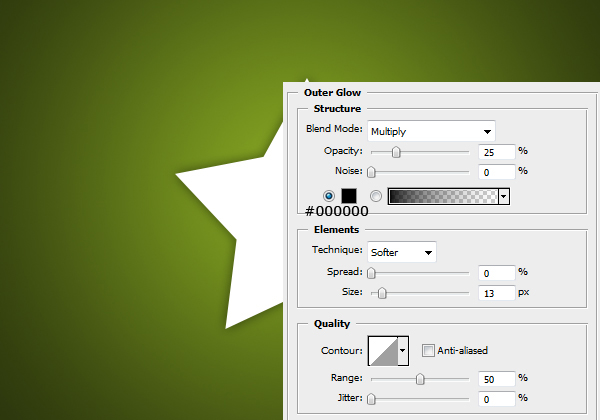
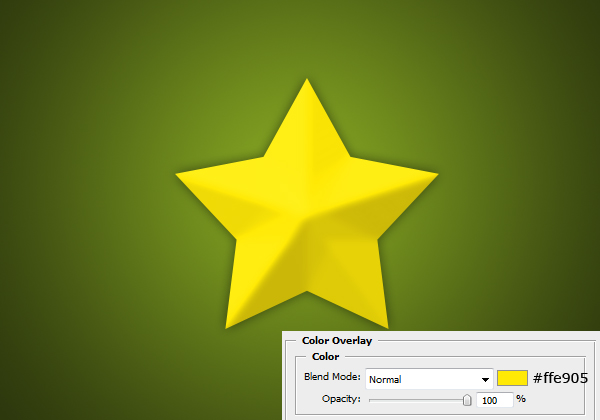
Result:

Step 4
Now we are going to be applying a shine effect to our star, so create another new layer and select the area of the star (Ctrl + Click layer’s icon).

Go Select > Modify > Contract by 3 pixels.

Select the gradient tool and set it to linear and white to transparent. Fill the selection with this gradient so you have something like this.

Lower the opacity to 75%.

Step 5
As a finishing touch we are going to be adding a starburst effect in the background so create a new layer above the background layer and make a shape using the ‘registration target 2’ shape so that you can’t see the outside of it.

Set the blend mode to Overlay and the opacity to 10% and you are complete.


oh~ nice
thank you
It is a sort of work which I like to learn
thanks very much
Thanks for the comments guys, glad you liked it :)
That looks really good. :D
Thanks for the tut. ^_^
I thought you did a good job with the instructions :) Kudos to you!
Thanks Dale & connie :D
Reminds me that I still have to send some christmas (e-)cards, I’ll use this design for it aswell :-)
well, it didnt come out quite like yours, but hey it worked.
@rebecca: You could post your outcome, I’d be interested to see how people’s stars turned out.
Great tutorial! Thanks a whole bunch! [=
Great tutorial. Step 5 didnt succeed, the background turned yellow.
Thanks Pa kour.
@Ninja: if the starburst shape was yellow (and had the green in the background) this means that the shape’s colour was still yellow from the star, so just set the colour (at the top of the screen) to white.
what is the registration shape 2?
There are a list of default shapes that adobe bundles into Photoshop, and one of them is named ‘registration shape 2’ which is the one I used for this tutorial.
Hey great tutorial. I didn’t want to bother trying to find the photoshop bundle so I looked up this tutorial for the starburst effect:
http://www.webdesign.org/web/photoshop/photoshop-basics/creating-a-starburst-effect.16167.html
Keep the great tutorials coming PSDCORE!
Thanks Steve, although I find using the custom shape a lot quicker than making it from scratch :)
I seem to encounter a problem
You see..
I get up to the part
where it says
Select > Modify
BUT
When I go there
Modify is in grey and unaccessable..
Hey Stevo, so in step 4 you need to select the area of the star (Ctrl + Click the layer’s icon) first (make sure there are the ‘marching ants’ around the star) before you can modify the selection.
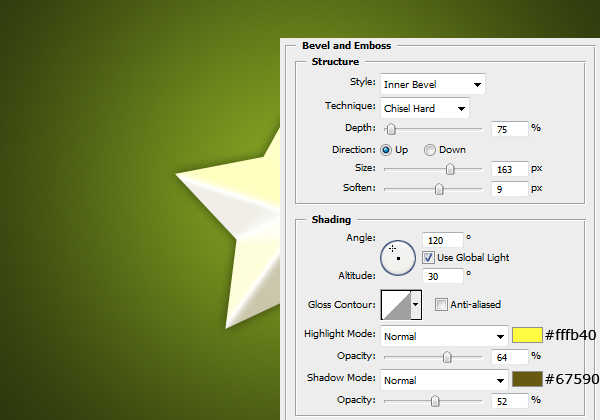
In step3, the second picture
at the last setup of Bevel!
u give the color code a 5 digit but actually the code is 6!
here it is!
thanks! :)
675900
Sorry about that, thanks for pointing that out so people know the full number :)
thanks
hahahaha ive made it again…wow easy tutorial…i should say its COOL!hahaha thanks man! can u teach me how to make that background of yours in this site…its awesome black man! make some more! wooohhhh! God bless! and more power! more, more more…hahaha
Thanks Dante, to create the background on PSDCORE, I took a abstract picture, and used a soft brush to erase around the edges to create a feathered effect. Then I set the blend mode to luminosity so it blended into the background colour without intruding on the rest of the design/content.
I can’t find the registration shape 2 :(
Select the custom shape tool and beside shape you can click the current shape and it brings up a list of them. To view all of the default shapes click the little arrow to the right and select “All”.
it damn nice